10: HTML5 Video
This post was published in 2016 and is kept here for reference. It may contain information that's outdated or inaccurate.
Today we’re looking at HTML5 video – well not in the traditional sense. We’re looking at using the <video> element to create a texture and then applying it to an object in our 3D scene.
I’m using the trailer for the CC-Licensed “Big Buck Bunny” movie for my video.
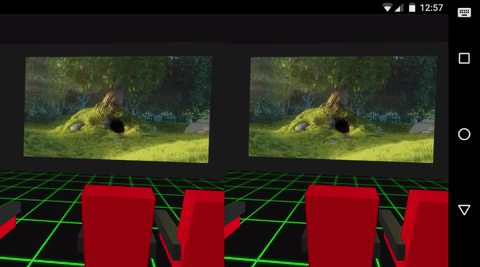
Creating a little cinema
Before we get on to actually using a video, we need somewhere suitable to play it. So let’s build a cinema.
Abstractly a cinema is a bunch of seats facing a screen. So let’s work with that. First the chairs layout.
A chair is made of a number of BoxGeometry’s grouped inside an Object3D:
var chairObject = new THREE.Object3D();
var chairBase = core.build(
  'BoxGeometry'
  // etc...
);
var chairBack = core.build(
  'BoxGeometry'
  // etc...
);

chairObject.add(chairBase);
chairObject.add(chairBack);
// etc.
I’ve not given the full exhaustive source for creating a chair there, but you can see how I do it in full in 10/demo.js#L40-L97.

We can define the layout of the chairs as a multidimenstional array, with 0 meaning no chair and 1 meaning a chair:
var chairArrangement = [
  [0, 0, 1, 1, 0, 1, 1, 0, 0],
  [0, 1, 1, 1, 0, 1, 1, 1, 0],
  [1, 1, 1, 1, 0, 1, 1, 1, 1],
  [1, 1, 1, 1, 0, 1, 1, 1, 1],
];
And then we can loop through this array and position each chair model in the scene:
var height = 0;
var metrics = {
  width: 6,
  height: 6,
  depth: 8,
};
var chairs = [];
var xOffset = (metrics.width * chairArrangement[0].length) / 2;
chairArrangement.forEach(function(row, i) { // for each row
  var _row = [];
  row.forEach(function(col, j) { // for each col
    if (col == 1) {
      // create a clone of our chair
      var chair = chairObject.clone();
      // position the chair
      chair.position.x = (j * metrics.width) - xOffset;
      chair.position.y = height * (0.3 * metrics.height);
      chair.position.z = i * metrics.depth;

      // add the chair to the scene
      scene.add(chair);
      _row[j] = chair;
    }
  });
  chairs.push(_row);
  height++;
});

Now that we’ve made a bunch of chairs, wouldn’t it be cool to randomly position the camera in one on each load? It’s quite simple to do, just take the chair.position and use it to set the camera.position (with some minor tweaking)
var randomIndex = function (array) {
  return Math.floor(Math.random() * array.length);
};
var randomSeat = function () {
  var indexR = randomIndex(chairArrangement);
  var indexC = randomIndex(chairArrangement[indexR]);

  // Make sure we've got a chair (1) not an empty space (0)
  while (chairArrangement[indexR][indexC] == 0) {
    indexC = randomIndex(chairArrangement[indexR]);
  }
  return {
    row: indexR,
    col: indexC
  };
};

var gotochair = function (seat) {
  var targetChair = chairs[seat.row][seat.col];
  camera.position.set(
    targetChair.position.x,
    targetChair.position.y + 4,
    targetChair.position.z
  );
  camera.lookAt(
    new T.Vector3(
      screen.position.x,
      screen.position.y,
      screen.position.z
    )
  );
};

gotochair(randomSeat());
The screen
For the screen we just have a massive BoxGeometry again, positioned in front of the rows of chairs. We’ll texture this using the video later on, but for an initial state it’s a good place to put some instructions.
var videotexture = textureLoader.load('video.png');
var screen = core.build(
  'BoxGeometry', [120, 60, 0],
  'MeshLambertMaterial', [{
    color: 0xffffff,
    map: videotexture,
    overdraw: 0.5
  }]
);
screen.position.set(0, 20, -50);
scene.add(screen);

And now that we have a screen, we can load a video. For this we’re going to create a video element, with a number of source element children that specify the various formats to use.
// Create a video element
var video = document.createElement('video');
  video.poster = 'video.png';
// Add the sources...
// webm
var videoSource = document.createElement('source');
videoSource.src = 'video.webm';
videoSource.type = 'video/webm';
video.appendChild(videoSource);
// ogg
videoSource = document.createElement('source');
videoSource.src = 'video.ogv';
videoSource.type = 'video/ogg';
video.appendChild(videoSource);
// mp4
videoSource = document.createElement('source');
videoSource.src = 'video.mp4';
videoSource.type = 'video/mp4';
video.appendChild(videoSource);
Next we’ll create a 2d canvas on which we’ll later load the video frames:
// Make your video canvas
var videocanvas = document.createElement('canvas');
var videocanvasctx = videocanvas.getContext('2d');

// Set its size (multiples of 8!)
var vidw = 1024;
var vidh = 512;

videocanvas.width = vidw;
videocanvas.height = vidh;

videocanvasctx.fillStyle = "#222222";
videocanvasctx.fillRect(0,0,vidw,vidh);
Then when the video is playing, update the canvas in our render loop so that it gets the current frame of the video:
var update = function () {
  if ( video.readyState === video.HAVE_ENOUGH_DATA ){
    //draw video to canvas starting from upper left corner
    videocanvasctx.drawImage(video, 0, 0);
    //tell texture object it needs to be updated
    videotexture.needsUpdate = true;
  }
  // Other bits in our loop...
};
To trigger the video.load() and video.play() and assign the texture to our screen, we’re using vreticle.js to provide an ongazelong event.
var playing = false;
screen.ongazelong = function () {
  if (!playing) {
    videotexture = new THREE.Texture(videocanvas);
    videotexture.wrapS = videotexture.wrapT = T.RepeatWrapping;
    videotexture.repeat.x = 1;
    videotexture.repeat.y = 1;
    videotexture.offset.x = -.15;
    videotexture.offset.y = .1;
    screen.material.map = videotexture;
    video.load();
    video.play();
    reticle.remove_collider(screen);
  }
};
reticle.add_collider(screen);
Issues on mobile
Initially I had tried to simply video.load() and video.play() the video when the scene loaded. This worked fine on Chrome desktop, but not on Chrome mobile. After a lot of fiddling and Googling I found that this is because Chrome limits automatically triggering video playback with JavaScript. For example you don’t want a website you’re viewing on your phone to automatically load and play a massive video file over your data connection.
That’s fair enough, so to get around this we have to trigger the video.load() and video.play() from within a click/touchstart event.
Ammending our earlier screen.ongazelong we can just add a check to see if we’re on mobile, and then addEventListener to listen for a click and trigger video.load() and video.play(). You can see the updated screen.ongazelong even in demo.js#L195-L229
By this point the video is playing nicely (not so performantly on mobile though!) but I wanted to add another feature. When you’re sat in a cinema or even when you’re watching a TV, the light from the screen is usually cast around the room. So let’s do that in our scene.
I’m using a library called Color Thief to extract the four dominant colors in each frame of the video, and then using these to color four THREE.PointLight’s that I’ve positioned around the screen.
First setup the lights:
var lightsobj = [
  [0xffffff, -25, 30, -35],
  [0xffffff, 25, 30, -35],
  [0xffffff, -25, 0, -35],
  [0xffffff, 25, 0, -35]
];
var lights = [];
lightsobj.forEach(function (lobj, i) {
  var _light = new T.PointLight(lobj[0], .5, 0, 1);
  _light.position.set(lobj[1], lobj[2], lobj[3]);
  lights.push(_light);
  scene.add(_light);
});
And then later on in the render loop, each time we get a new frame we can grab the dominant colors and recolor the lights:
var colorThief = new ColorThief();

var update = function () {
  // Other video frame stuff...

  var domcolors = colorThief.getPalette(videocanvas, lightsobj.length);
  domcolors.forEach(function (color, i) {
    var colorrgb = core.template("rgb({r}, {g}, {b})",{
      r:color[0],
      g:color[1],
      b:color[2],
    });
    var tcolor = new THREE.Color(colorrgb);
    lights[i].color = tcolor;
  });

  // Other render loop stuff
}
And we’re done. You might want to mess with the intensity of the lights, or play with having more lights/dominant color samples.
A note about the delay in publishing this write-up
So this write-up (though dated 10/10/16) was actually published on 11/10/16. I decided to refactor most of my core.js library while working on day 10’s hack and it took a little longer than I had planned.
Cardboctober day 10
View this Cardboctober hack • View the source code on Github
View the other submissions for day 10 on the Cardboctober website.
Part of the "Cardboctober" series
- Announcing Cardboctober
- 01: Basic VR
- 02: Raycaster based look interaction
- 03: Even better gazed based look interaction
- 04: Skyboxes and generating meshes
- 05: Loading external models
- 06: VR Pairs Game
- 07: Cardboard hardware (cardware?)
- 08: Playing sounds
- 09: Speech recognition
- 10: HTML5 Video
- 11: Webaudio Beat Sequencer
- 12: AAAAH! Zombies
- 13: AAAAH! More Zombies
- 14: Debugging your Cardboard with Chrome
- 15: The Hierarchy of Needs in Quick Google Cardboard Hacks
- 16: Getting in and out of Fullscreen
- 17: Displaying Pertinent Information
- 18: Moving around in VR
- 19: Which way is North? Part 1
- 20: Which way is North? Part 2
- 21: One size doesn't fit all
- 22: Putting it all together
- 23: Planning Tetrominoes in VR
- 24: Basic Game Board
- 25: Creating and Moving Pieces
- 26: Rotating Pieces
- 27: Moving with gaze
- 28: Planning Revisited
- 29: Blocks out of the pram
- 30: Github Contributions
- 31: Something in the Shadows
Want to reply? I've hooked up Webmentions, so give it a go!